Here at Wheelbase, we’re sticklers for bike cleanliness, and for a number of very good reasons, however, when we reinforce the importance of keeping your bike clean to new cyclists we often get asked how exactly do you do this effectively. With this in mind we thought we’d put together a comprehensive guide for you to follow step-by-step to help ensure your cleaning skills are up to industry standard!
Now, even the most dedicated cyclist wishes that washing their bike was as simple as splashing it with a hose, throwing some suds over it, rinsing it off and then shoving it back in its rightful place. Sadly this really isn’t the case; so let’s break it down into a step-by-step cleaning routine which I have developed over time and which may help you in the future…

Follow these simple steps and you’ll be able to establish a simple and effective bike cleaning routine.
Step 1 – My first important task is to always remove my electrical items such as lights and my Garmin or Wahoo. Yes, most of these items are waterproof, however we don’t want them to be given a considerable wash, do we?!

Remove all your digital tech and electronic accessories before you begin!
Step 2 – This is a good one, and I find this step really beneficial especially in the winter; I like to rinse my bike off first, with the garden hose. Never use a jet wash, unless of course it’s a bike-specific one such as the Muc-Off Pressure Washer. Traditional, non-bike-specific jet washes run at a higher pressure which tends to push grease out of bearings and we need to keep the grease inside the wheel hubs, bottom bracket and headset so that everything runs smoothly. Rinsing the bike before you do a thorough clean also ensures that you won’t be rubbing in all the big, gritty lumpy stuff around your nice shiny bike.

An initial rinse all over the bike is a great starting point.
Step 3 – Once rinsed I then like to apply Muc-Off bike cleaner; this is an industry go-to when it comes to bike cleanliness & maintenance and it’s a product we are always recommending to our customers. We keep plentiful amounts of Muc-Off bike cleaner in stock at all our stores and endorse liberally covering your bike in the pink stuff, ensuring both sides of the bike are covered along with wheels and everything in between.
Step 4 – Once I’ve let the Muc-Off bike cleaner do its magic I take my small soft brush and I start working it over the frame, saddle, and handlebars. I always leave parts like the underside of the down tube and the wheels and tyres until last as I don’t want to be dragging the dirt back over the cleaner parts of the bike.
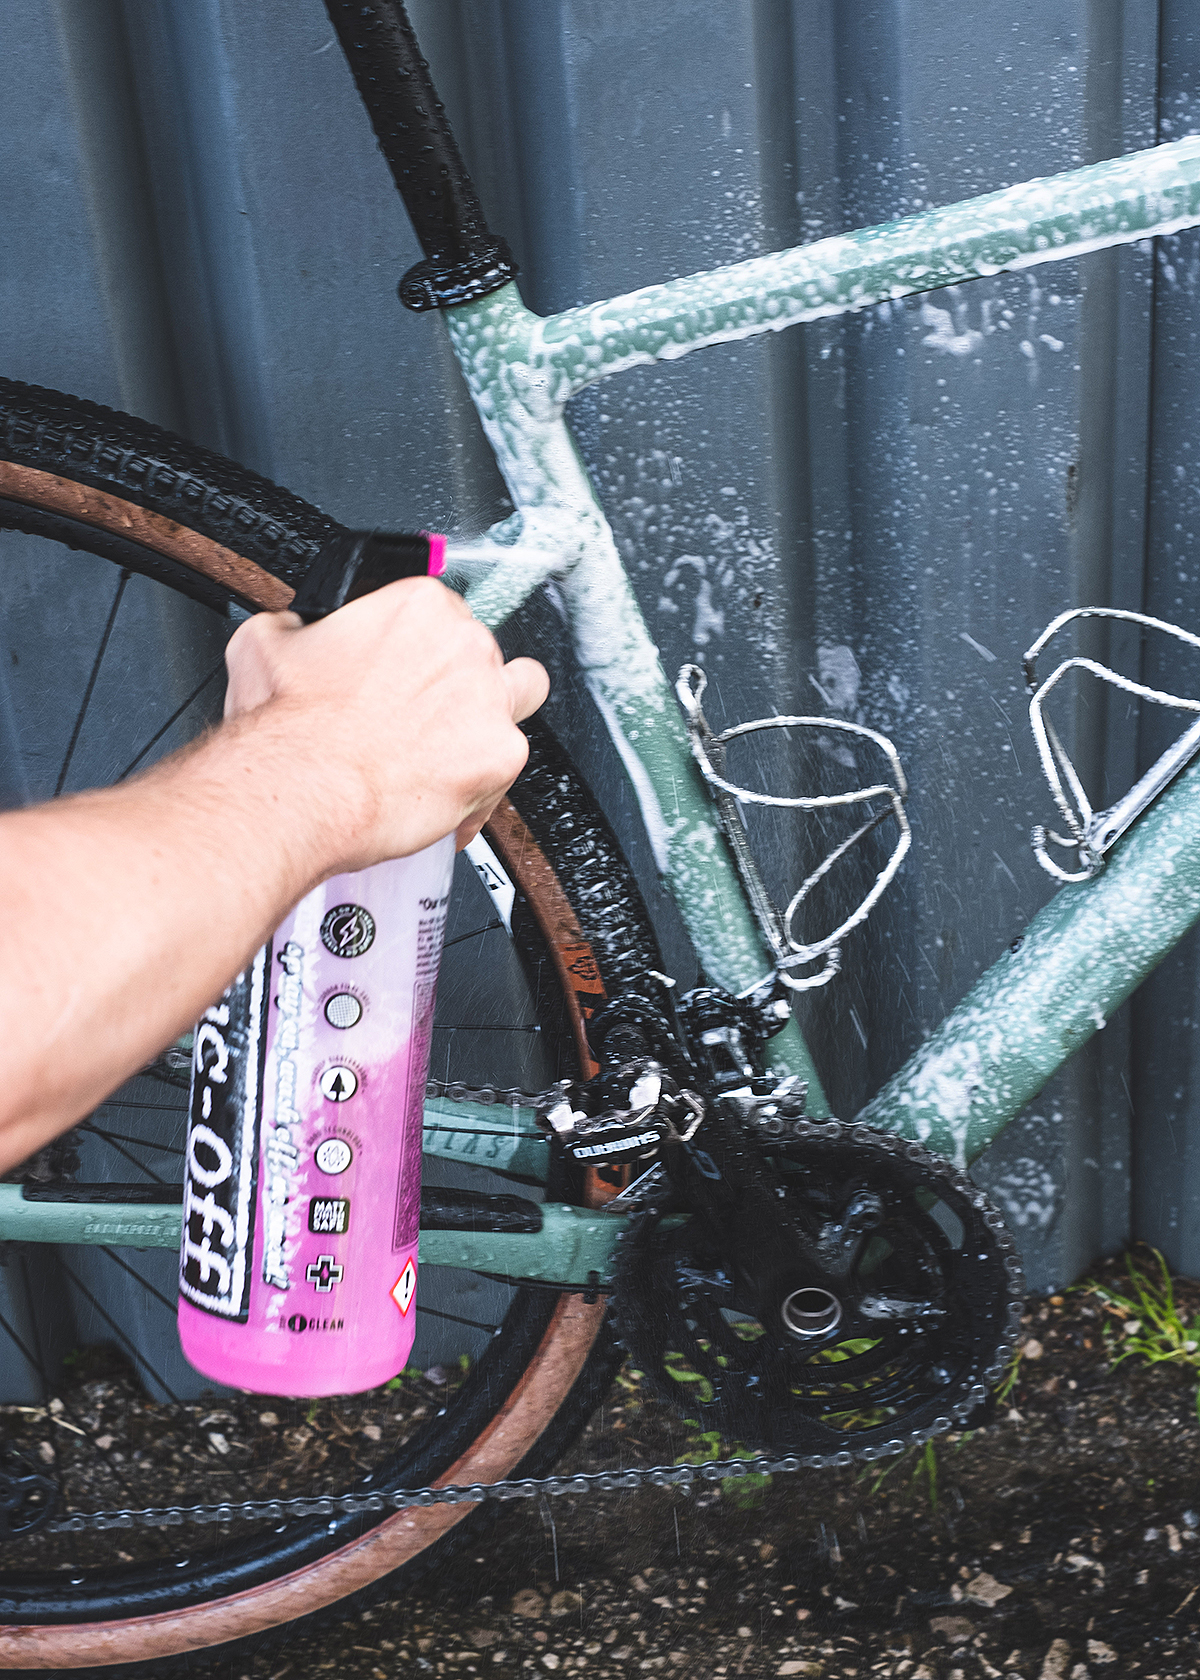
Liberally cover your bike in Muc-Off Bike Cleaner for the best results.
Step 5 – Once Satisfied that I have done a proficient job in scrubbing my bike clean I then set to thoroughly rinsing the bike with the hose; getting rid of the grit, grime and soap suds.

Another quick hose-down before beginning on the bike’s drivetrain.
Step 6 – This is a really important part of the process – degreasing and cleaning your drivetrain. I start off spraying Muc-Off Drivetrain Cleaner on the chainrings, cassette and chain and leave this for a few minutes for it to soak in. I then take the little brush from my Muc-Off brush set and I scrub my cassette from all angles, once satisfied I then take my Muc-Off chain cleaning tool and put that to work. This is best done in a portable work stand if you have one as it allows you to pedal the bike freely, helping to ensure that you don’t miss a single spot on your entire drivetrain. Once you’re satisfied that the drivetrain is completely clean, rinse off the entire groupset, and repeat if necessary. It’s important to note that you should always avoid getting any drivetrain cleaner near your hydraulic disc brake calipers or brake pads. Some of the chemicals are abrasive and can contaminate your brake pads causing them to make terrible screeching sounds and may affect your bike’s braking capacity; if in doubt check your own cleaning product’s guidelines before using.

Using a good drivetrain cleaner will remove all of the built up grease and grime.

A good bike cleaning brush will help to remove stubborn dirt from fiddly areas of the drivetrain.

Once the drivetrain cleaner has taken affect you can rinse of the loose dirt and grime.

It’s great to see the shine coming back to your drivetrain; regular cleaning will keep your components functioning more efficiently.
Step 7 – Now that your bike and drivetrain are squeaky clean, DRY YOUR BIKE. This is such a simple step that often gets missed. Leaving your bike wet even on stainless parts will inevitably cause surface rust, so drying is essential. I dry my handlebars, shifters, saddle and everything in between apart from my groupset first with either an old towel or microfibre cloth. I then dry my groupset with a different one so there’s no cross-contamination and If there’s any residue left on the chain or cassette I’m not wiping that back all over my bike.
Step 8 – Once my bike is bone dry I then re-apply lubricant to my chain. Depending on the weather I’ll use Muc-Off wet or dry lube. It’s as simple as this – wet lube for wet weather, dry lube for dry weather! Wet lube doesn’t wash off quite as easily and is more resilient to moisture in bad weather. Dry lube is excellent for dry and sunny days on your bike and will not pick up dirt and dust like a wet lube tends to do. Adopting this practice always means that you can just hop on your bike at a moment’s notice and go and ride. Beneficial if you’re asking me!
In conclusion, regularly sticking with this sort of cleaning routine will almost certainly extend the lifetime of your bike and all its moving components, not to mention keep heads turning, because to be completely honest, everyone loves a clean bike!

Clean and ready for more gravel-bound fun, my Focus Atlas 6.8 is always well-maintained.
Written by Andrew Barlow
Photos by Andrew Barlow
Have you seen our Fast Bike feature? Missed some of our best bikes? You can now see all of our featured bikes in one place over on Pinterest where you’ll find links to each of our Fast Bike Feature Blogs too!
Click the link below and search our archive…
